
Introduction
Project scheduling is one of the most valuable skills in the construction industry. Whether you’re a civil engineering student, site engineer, planning engineer, quantity surveyor, or project manager, learning Primavera P6 can significantly improve your career opportunities.
Primavera P6 is one of the world’s most widely used project planning and scheduling software applications. It enables construction professionals to create detailed schedules, monitor project progress, allocate resources, manage costs, and deliver projects on time.
If you’re starting from scratch, the software may seem overwhelming. Fortunately, with the right learning path, anyone can master Primavera P6.
This guide walks you through everything you need to know as a beginner—from installation to creating your first construction project schedule.
What is Primavera P6?
Primavera P6 is a project planning, scheduling, and project controls software developed by Oracle.
It helps organizations manage:
- Construction Projects
- Infrastructure Projects
- Oil & Gas Projects
- Manufacturing Projects
- Power Plants
- Rail & Metro Projects
- Industrial Projects
Thousands of companies worldwide rely on Primavera P6 for project planning and monitoring.
Why Should Civil Engineers Learn Primavera P6?
Primavera P6 is one of the most in-demand software skills in construction.
Benefits include:
✔ Better Job Opportunities
✔ Higher Salary
✔ Professional Project Planning Skills
✔ Improved Time Management
✔ Resource Optimization
✔ Cost Monitoring
✔ Risk Management
✔ International Career Opportunities
Many companies consider Primavera P6 knowledge essential for planning engineers and project controls professionals.
Who Should Learn Primavera P6?
Primavera P6 is suitable for:
- Civil Engineering Students
- Site Engineers
- Planning Engineers
- Quantity Surveyors
- Project Engineers
- Construction Managers
- Project Managers
- Consultants
- Contractors
- Infrastructure Professionals
Primavera P6 Learning Roadmap
Beginner
↓
Software Installation
↓
Understanding Interface
↓
Creating Enterprise Project Structure (EPS)
↓
Organization Breakdown Structure (OBS)
↓
Creating Projects
↓
Calendars
↓
Work Breakdown Structure (WBS)
↓
Activities
↓
Relationships
↓
Constraints
↓
Scheduling
↓
Critical Path Method (CPM)
↓
Resources
↓
Cost Loading
↓
Baselines
↓
Tracking Progress
↓
Reports & Dashboards
↓
Professional Project Planner
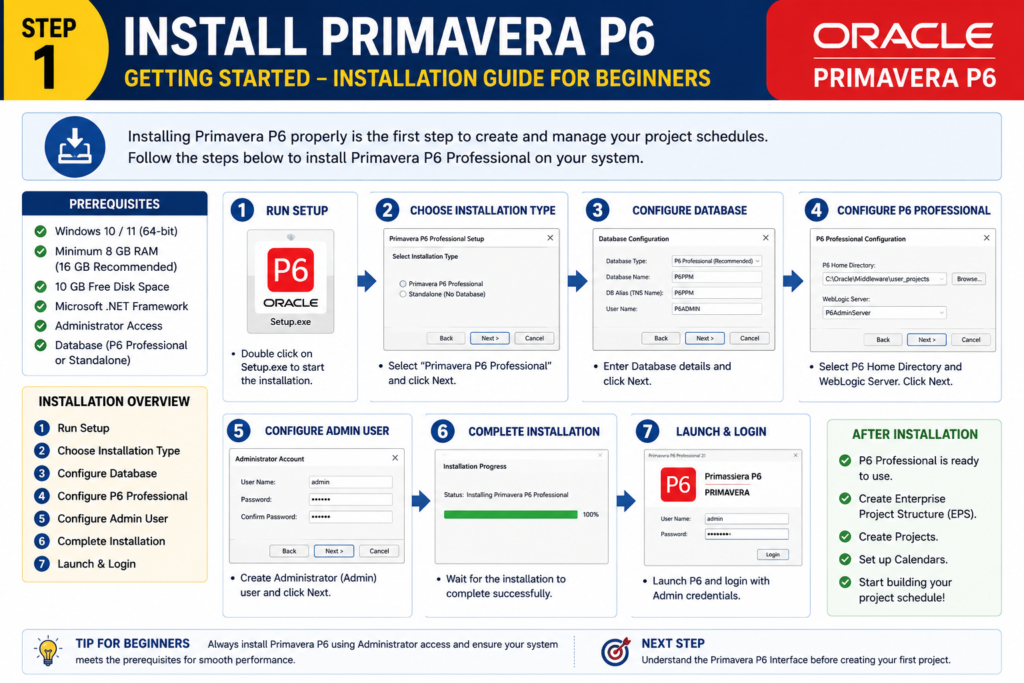
Step 1 – Install Primavera P6
Choose the appropriate version of Primavera P6.
Typical installation includes:
- Database Setup
- User Configuration
- Licensing
- Initial Login
- Sample Database
After installation, familiarize yourself with the software interface before creating projects.
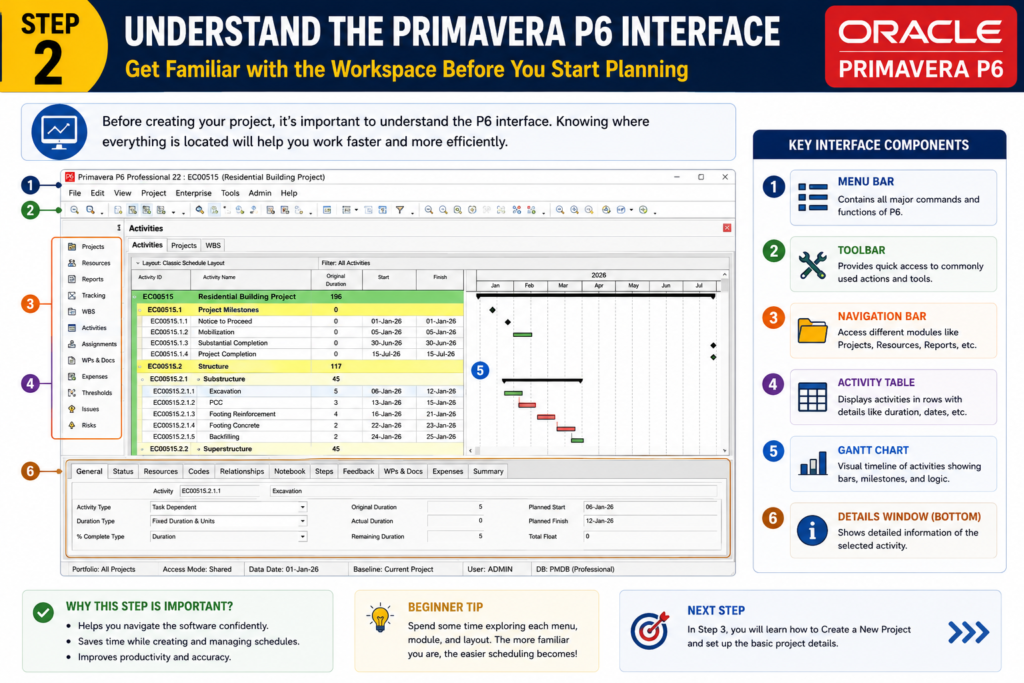
Step 2 – Understand the Primavera Interface
Before planning projects, learn the workspace.
Key sections include:
- Menu Bar
- Navigation Bar
- Activity Table
- Gantt Chart
- Layouts
- Bottom Layout
- Project Window
- Resource Window
- Reports
Knowing where everything is located improves productivity.
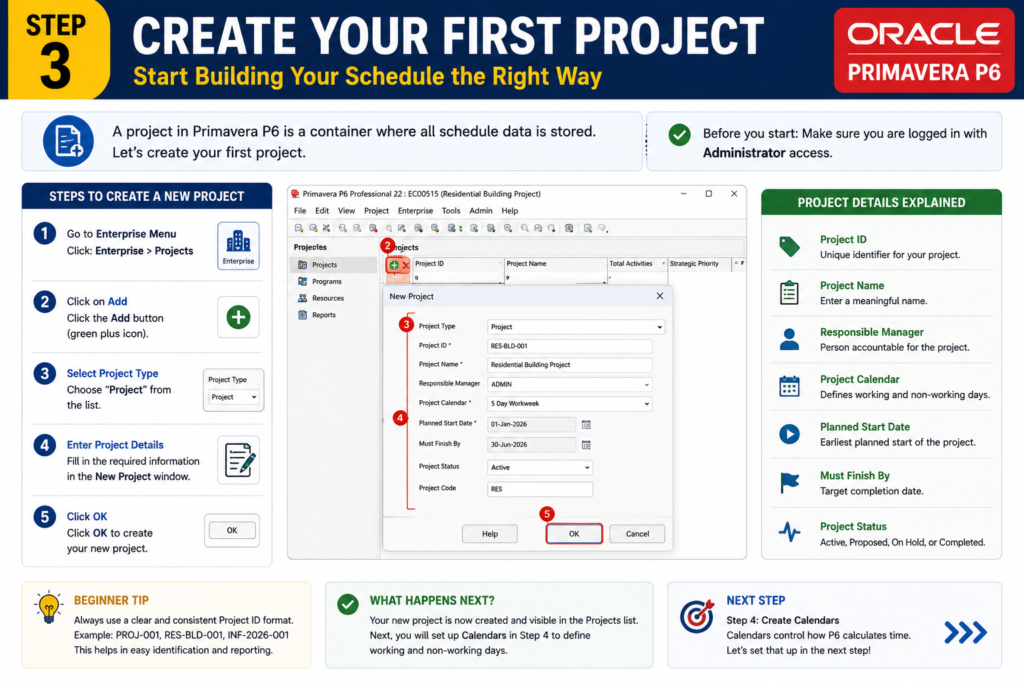
Step 3 – Create Your First Project
Every schedule begins with creating a new project.
You’ll define:
- Project Name
- Project ID
- Planned Start Date
- Finish Date
- Responsible Manager
- Project Calendar
This becomes the foundation of your schedule.
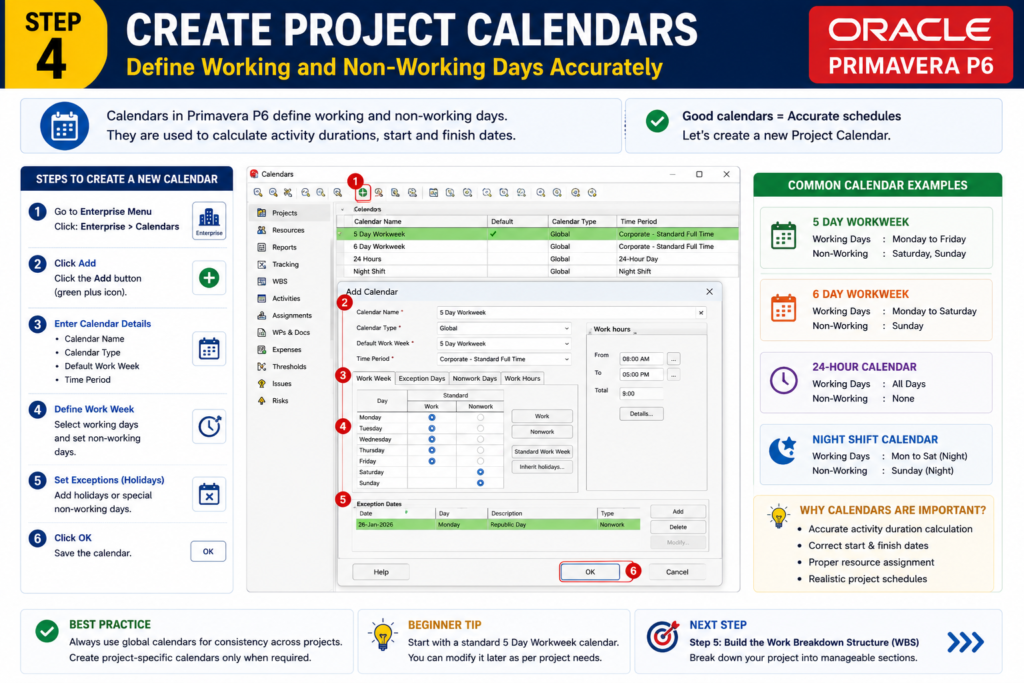
Step 4 – Create Calendars
Calendars determine working and non-working days.
Examples include:
- 5-Day Work Week
- 6-Day Work Week
- 24-Hour Calendar
- Night Shift Calendar
Correct calendars ensure accurate schedule calculations.
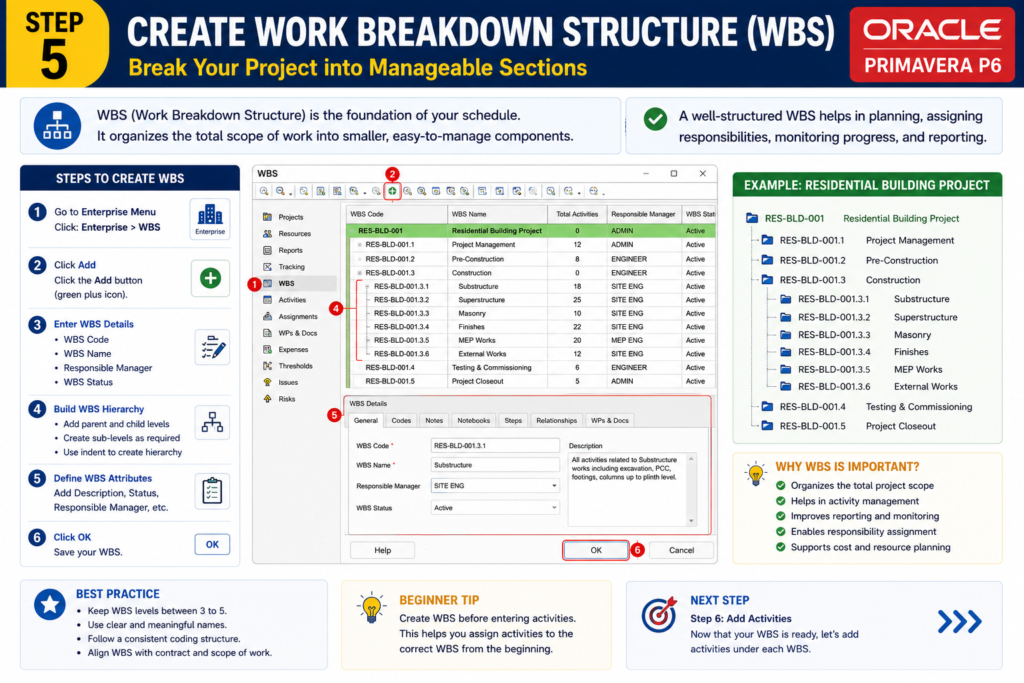
Step 5 – Build the Work Breakdown Structure (WBS)
The WBS divides a project into manageable sections.
Example:
Residential Building
↓
Site Preparation
↓
Foundation
↓
Ground Floor
↓
First Floor
↓
Roof
↓
Finishing
↓
External Development
A well-structured WBS improves planning and reporting.
Step 6 – Add Activities
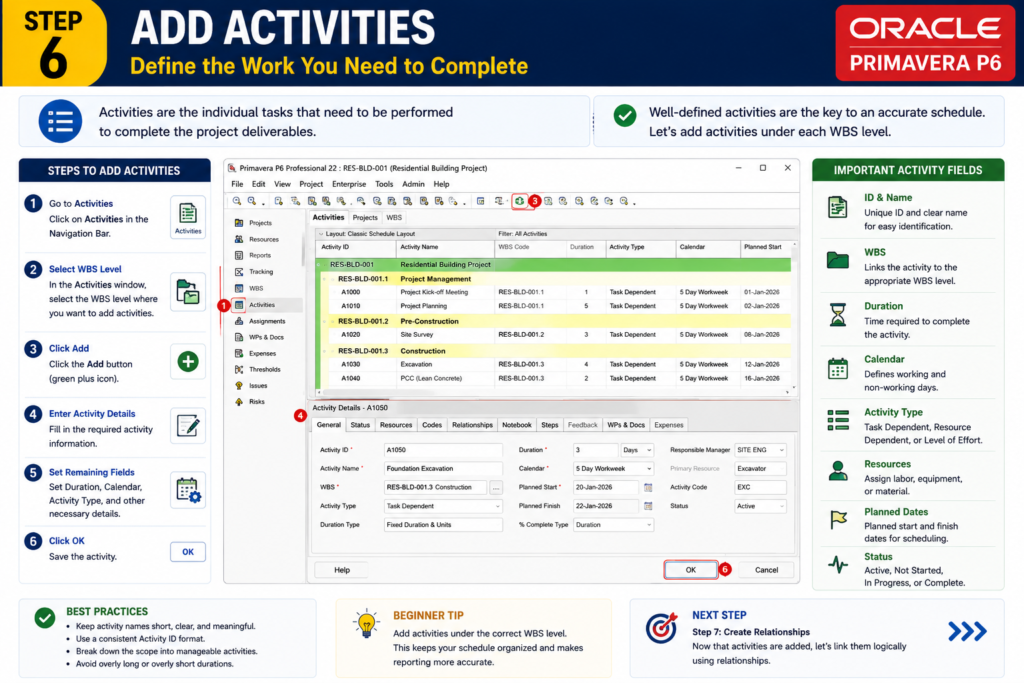
Activities are the individual tasks required to complete a project.
Examples:
- Excavation
- PCC
- Footing Reinforcement
- Footing Concrete
- Column Starter
- Backfilling
Each activity includes:
- Duration
- Start Date
- Finish Date
- Calendar
- Activity Code
Step 7 – Create Relationships
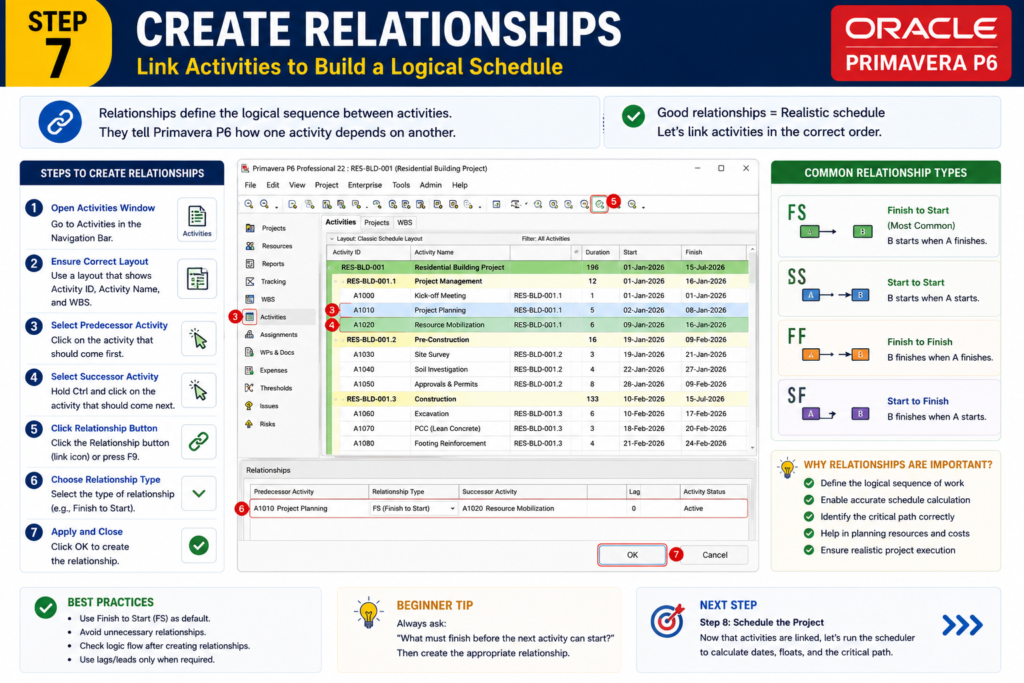
Activities must be linked logically.
Common relationship types:
- Finish to Start (FS)
- Start to Start (SS)
- Finish to Finish (FF)
- Start to Finish (SF)
Correct relationships generate realistic schedules.
Step 8 – Schedule the Project
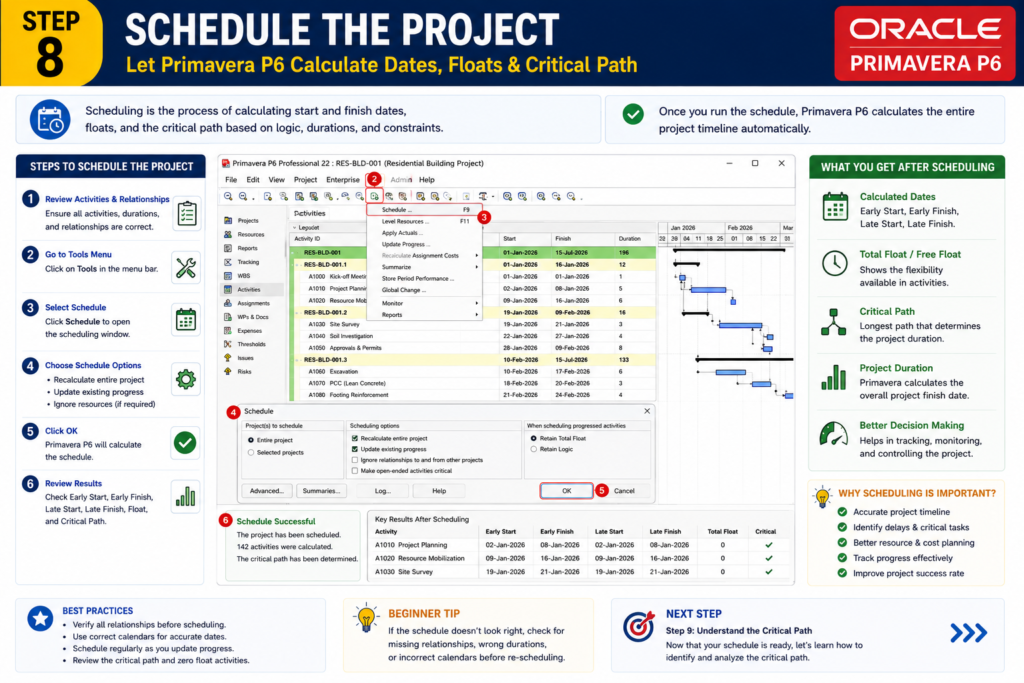
After entering activities and relationships, run the scheduler.
Primavera calculates:
- Early Start
- Early Finish
- Late Start
- Late Finish
- Float
- Critical Path
This produces your project timeline.
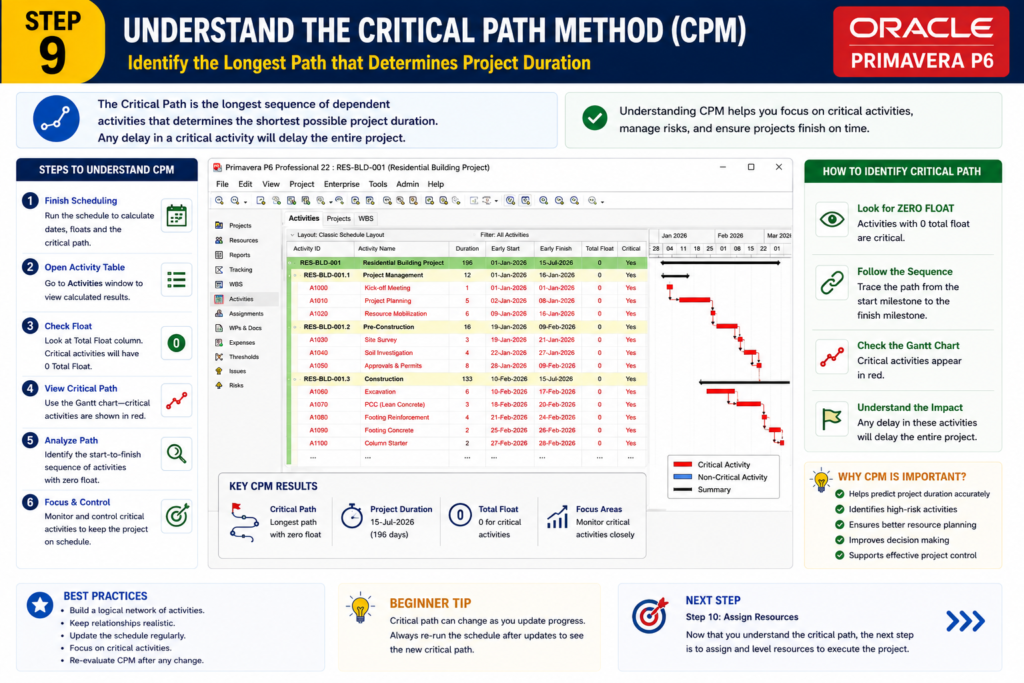
Step 9 – Understand the Critical Path Method (CPM)
The Critical Path is the longest sequence of activities determining the project duration.
Activities on the critical path have zero or minimal float.
Delays to these activities delay the entire project.
Understanding CPM is one of the most important skills for planning engineers.
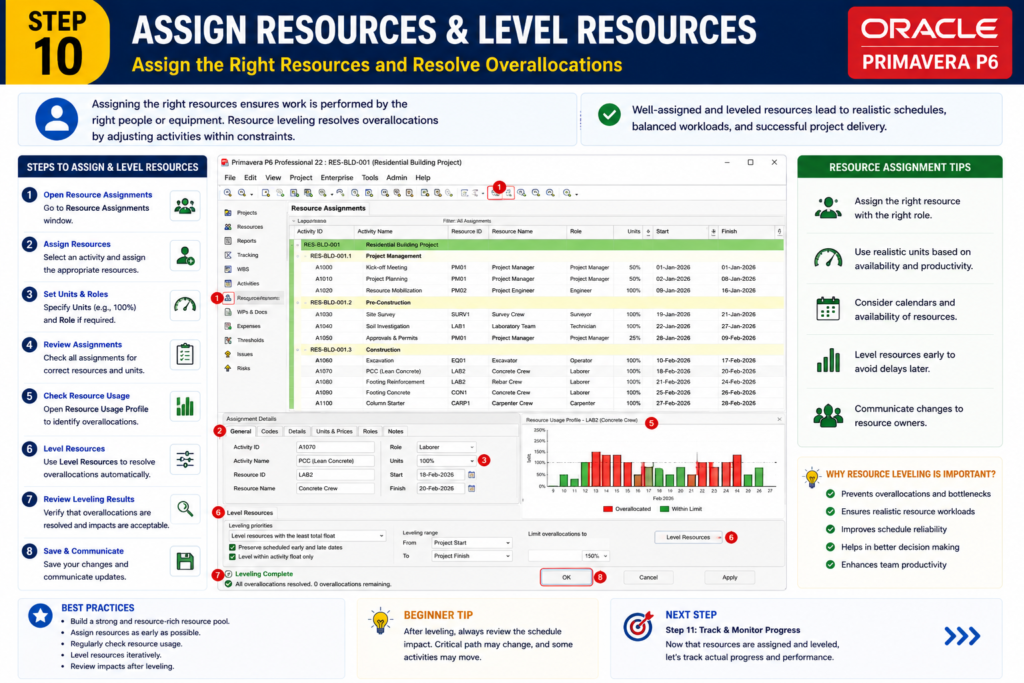
Step 10 – Assign Resources
Resources include:
- Labour
- Equipment
- Materials
- Engineers
- Machinery
Resource allocation helps optimize manpower and equipment utilization.
Step 11 – Cost Loading
Assign costs to:
- Labour
- Materials
- Equipment
- Subcontractors
Cost loading enables budget tracking throughout the project.
Step 12 – Create a Baseline
A baseline captures the original approved schedule.
Benefits include:
- Compare planned vs. actual progress
- Identify delays
- Measure performance
- Support claims and extensions of time
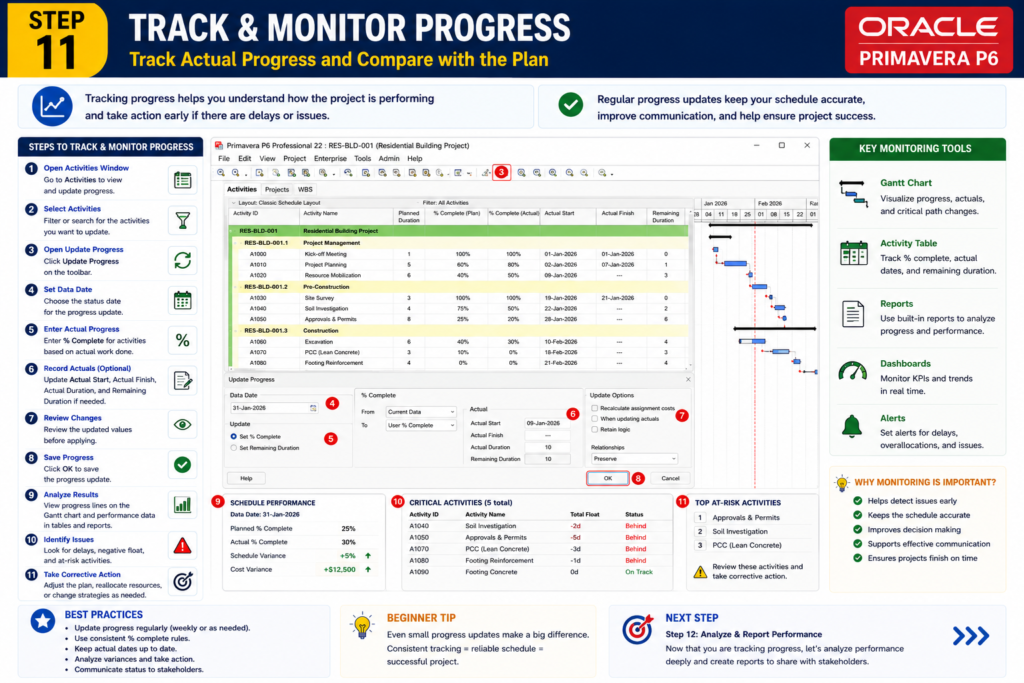
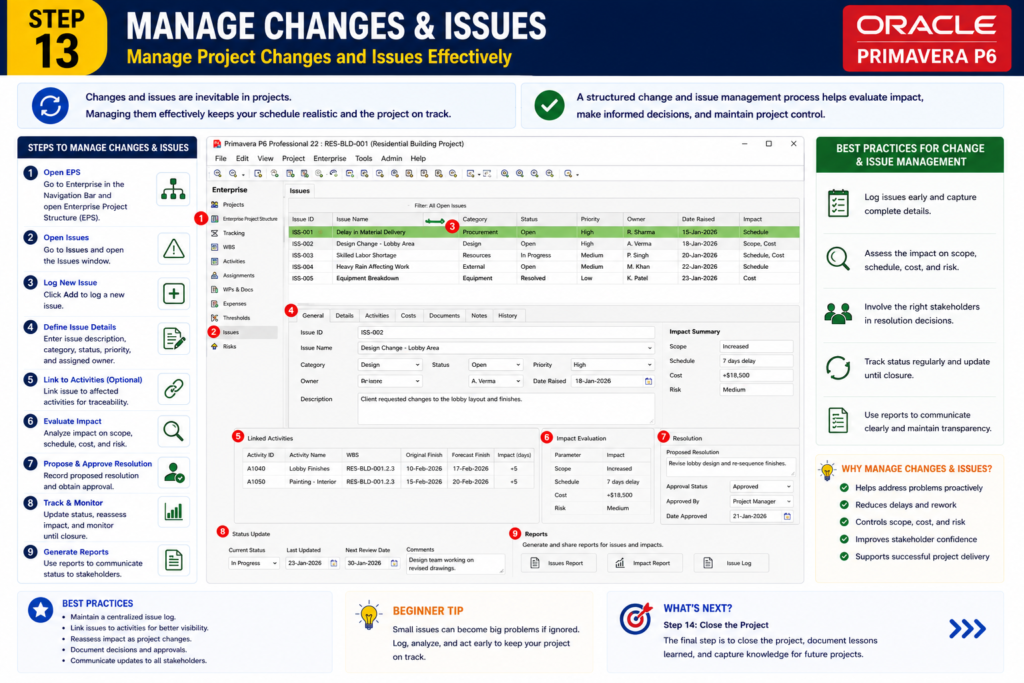
Step 13 – Update Project Progress
During execution:
- Update actual start dates
- Update actual finish dates
- Record percentage complete
- Enter remaining durations
- Monitor delays
Regular updates keep schedules accurate.
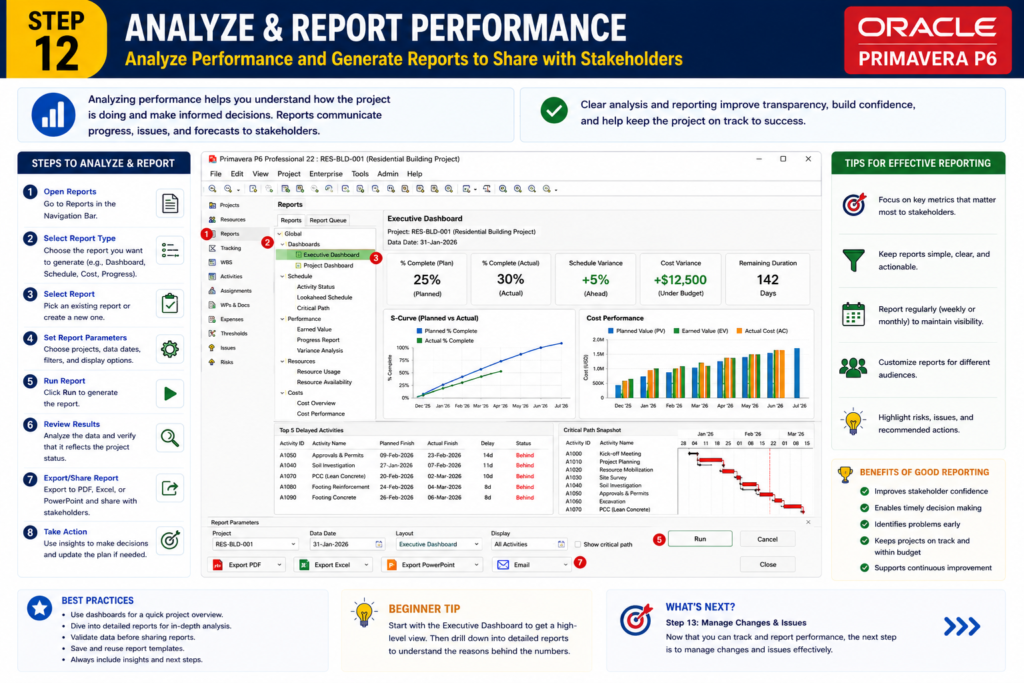
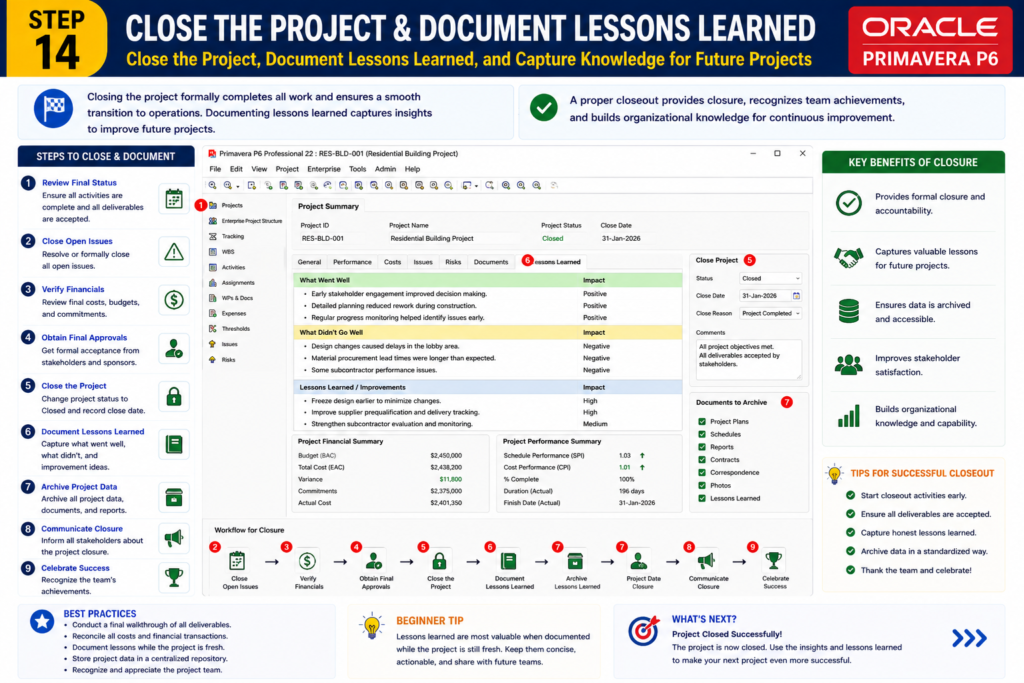
Step 14 – Generate Reports
Primavera P6 provides reports such as:
- Activity Reports
- Critical Path Reports
- Resource Histograms
- Cost Reports
- Baseline Comparison
- Progress Reports
- S-Curves
These reports support project reviews and client meetings.
Common Beginner Mistakes
Avoid these common errors:
- Using the wrong calendar
- Missing activity relationships
- Creating excessive WBS levels
- Not updating progress regularly
- Ignoring critical activities
- Forgetting to save baselines
- Incorrect resource assignments
Learning from these mistakes will improve your planning skills.
Best Tips for Learning Primavera P6 Faster
- Practice daily with sample projects.
- Learn scheduling concepts before using the software.
- Recreate real construction projects.
- Understand CPM thoroughly.
- Explore reporting features.
- Follow industry best practices.
- Build a portfolio of schedules.
Consistency is key to mastering Primavera P6.
Career Opportunities After Learning Primavera P6
Professionals skilled in Primavera P6 can work as:
- Planning Engineer
- Project Controls Engineer
- Project Scheduler
- Construction Planner
- Delay Analyst
- Cost Engineer
- Project Coordinator
- Project Manager
- Contracts Engineer
Primavera expertise is highly valued across construction, infrastructure, oil & gas, and industrial sectors.
Conclusion
Primavera P6 is more than just scheduling software—it’s a complete project management tool used by leading construction companies worldwide. By learning the fundamentals step by step, beginners can confidently create schedules, monitor progress, manage resources, and support successful project delivery.
The journey from beginner to professional planner starts with understanding the basics and practicing regularly. With consistent learning and hands-on experience, Primavera P6 can become one of the most valuable skills in your engineering career.
Frequently Asked Questions
Is Primavera P6 difficult to learn?
No. With structured learning and regular practice, beginners can understand the fundamentals within a few weeks.
How long does it take to learn Primavera P6?
Most learners can become comfortable with the basics in 4–8 weeks, depending on their practice time.
Is Primavera P6 better than Microsoft Project?
Primavera P6 is generally preferred for large and complex construction projects, while Microsoft Project is often used for smaller projects.
Do I need construction experience before learning Primavera P6?
No. However, understanding basic construction processes and scheduling concepts will make learning easier.
Can civil engineering students learn Primavera P6?
Yes. Learning Primavera P6 during college can improve employability and prepare students for planning and project controls roles.
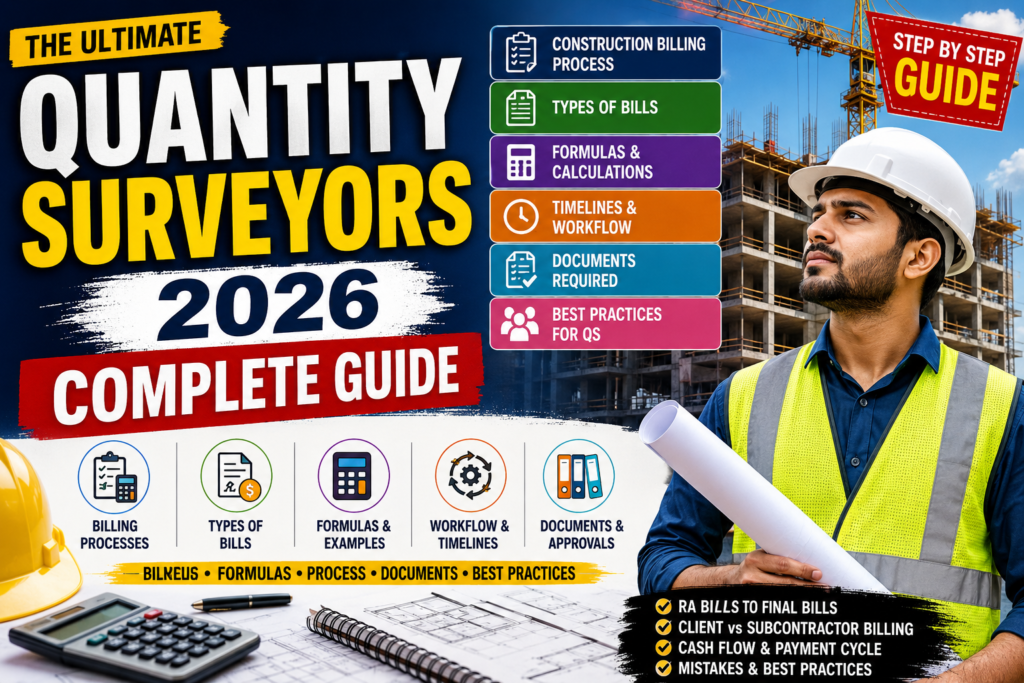
Pingback: Mastering Construction HOTO: The Ultimate Guide - qualconn
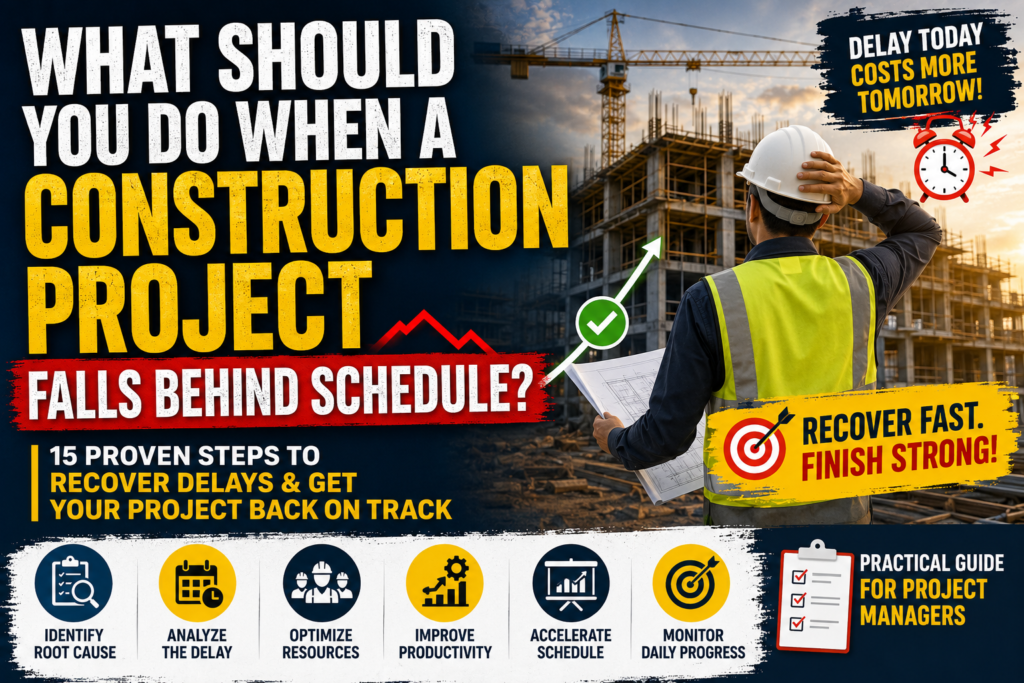
Pingback: How to Recover a Delayed Construction Project Fast